Description
Elements in EventIDE are core objects that carry out specific subtasks in an experiment. For example, there is an element that renders images, another element that plays videos or another one that collects eye-tracker data. The elements can be added into any
event, which is becomes the parent event for this element. Most of the elements operate only in a scope of the parent event. For example, if you deploy the
Button element, it only detects button presses, while the parent event is active. Fewer elements operate in the global scope of the entire experiment but they still need some event as a deployment 'nest'.
The concept of the functional elements is what makes EventIDE a flexible tool. Elements perform their tasks independently, even if they belong to the same type. It means that you can always add, remove or replace any EventIDE element, without breaking the rest of experiment's logic. If you have some experience in programming, you can always create your own elements that extend or enrich the default element set in EventIDE.
Global and local elements 
Property interface
The element carry out their tasks semi-automatically and usually there are no functions or procedures that has to be called in code in order to launch element's work. The very fact that you have added an element to an event makes the element operational. However, you can tune the element and request work's results through the
property interface.
All elements have a set of named properties that describe an operational status of the given element. For instance, the
Renderer-element has properties named Size and Location, which determine element's rendering viewport on the screen. The element properties can be changed at the design-time, in order to prepare an element's initial state before an experiment run. At runtime the properties can be read and modified in code.
Extending the element's working scope
When you want to make an element operational over several
events, you can utilize the hierarchical event layers in EventIDE. The idea is that you create a 'super' event that incorporates a sequence of subevents. Then add the 'extended' element into the 'super' event, such that element's working scope now is extended over all sub-events. For example, you have the Button element in the 'super' event, which, in turn, has several sub-events, where different images are presented consequently. In this case button presses will be detected at any moment of an image sequence.
Practical Use
- Most of the element properties can be also accessed and changed at the runtime, by accessing them via proxy variables in code snippets.
- Elements that belong to a particular event are listed in the Element panel, when the parent event is selected.
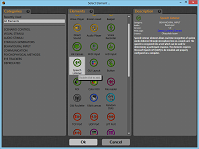
- When you click Add Element button, a dialog window 'Add Element' is shown, in which you can see all available element grouped by category (see screen shot below).
- When you enable an EventIDE AddIn, its elements are added into the 'Add Element' dialog.

Add Element Dialog
Complete Element List
The full list of elements:
AddIns manager.
You can obtain a detailed info about each of the EventIDE elements on the corresponding pages in this wiki. Search for an element name on the main wiki page.